Contact Us
The Regency Town House
13 Brunswick Square
Brighton & Hove
East Sussex
BN3 1EH, UK
Sign up for our Newsletter
Our monthly newsletter lists our upcoming events, reviews, news from the Town House, history features and snippets, plus a local exhibition listing.
Brick making
By the Regency period brick making was common place and widely used in areas that were abundant in clay, but which lacked other sources of building material like stone. Brighton was such an area. It was not rich in clay, but it did possess a thin layer of it, called ‘brick earth’. Through the Regency period this was systematically scraped off the land as raw material for the brick making process.
These bricks were mostly used sparingly for the ‘framing’ of buildings as they were a relatively expensive construction material. To avoid unnecessary and costly haulage in an age with little mechanical handling, it was the convention that the bricks required for a building project would be sourced from brick earth dug up immediately adjacent to the building site and then fabricated and fired in situ. This is exactly what happened in Brunswick Town. Brick earth was dug from Brunswick Square and the large excavation left at the end of the brick making process was infilled with the surplus spoil left over from digging the foundations and basement rooms of Brunswick Town houses.
Whilst it is not immediately obvious, there are many bricks in the average Regency home in the Brighton area, they are hidden behind the stucco (cement) layer that forms the visible external surface of the houses. Buff coloured bricks were very popular with Regency builders as they were thought to imitate a more expensive stone finish and many Brighton houses were finished in this way. As there was little appropriate local clay deposits for bricks of this colour, they were manufactured on the Isle of Wight, sailed to Shoreham on barges. Some enterprising building workers journeyed form the Island to Brighton on these barges in search of work.
Making the bricks
The manufacture of bricks begins with the preparation of clay to remove large stones and similar contaminates. The clay is then mixed to the right consistency for brick making, a process made easier in the late 18th century with the invention of the horse driven pug mill, an upside down metal cone equipped with turning knives which automatically processed the raw clay. When required the pug mill would ‘wind’ breeze fuel into the clay body to assist the firing of the brick.
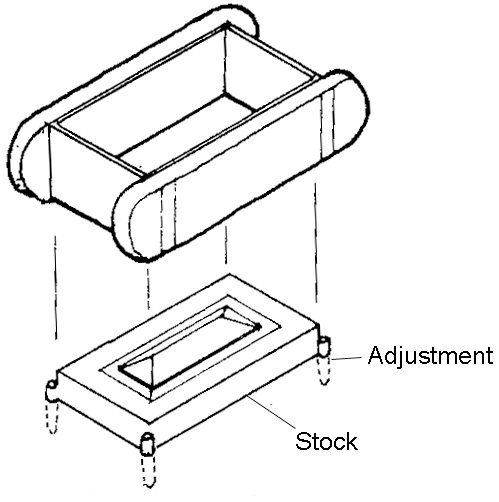
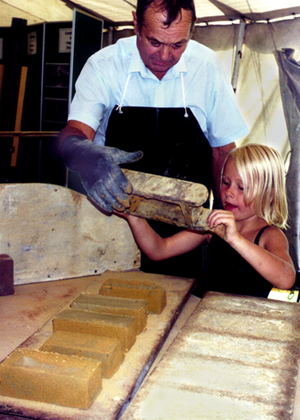
The Clay is then shaped to form bricks by a procedure that, during the Regency, was often based on pallet moulding. In this process, a four sided box made out of wood or metal with no lid or bottom was placed in front of the brickmaker on a base or ‘stock board’. This board had a raised block or ‘lack’ on it to create the hollow, or ‘frog’ conventionally seen on the top surface of the brick. The brickmaker would sprinkle the stock board with sand to prevent sticking and then fold his clay mixture into a short fat sausage shape before throwing it into the mould with just enough force to fill it completely and expel any trapped air. He would then use a wire bow to remove any excess clay from the top of the mould before smoothing the cut face with a stick or ‘strike’. Thereafter, a wooden board was placed on top of the mould before it was turned upside down and removed in order to reveal the brick.
Once made, the bricks were turned onto pallets for the slow drying process until ‘white’ hard. This would take about one week in the summer months, and during this time the bricks would shrink by over 7% in volume.They were then ready to be heated to a great temperature, or ‘fired’, when they would become a permanently non-plastic material, indefinitely retaining its shape.
Firing the bricks
In Regency Brighton many of the bricks used to build Brighton and Hove homes were usually fired in a ‘clamp’, a large temporary construction made primarily of the white hard bricks and the fuel to fire them. The main advantage of clamp firing was that it could be done on the building site without the need to fabricate a kiln.
When a clamp was made the earth was first levelled, often with old defective, discarded, bricks. Then channels were built across the ground using a combination of first old, and then new white hard bricks, and these were filled with fuel which could be wood, coal, charcoal, or breeze.
Half a dozen layers of newly made bricks were then placed on top and interspersed with more fuel, before finally more unfired bricks were packed in layers to a total height of about 14 feet. The stacking of the bricks was done carefully to aid the passage of superheated air throughout the clamp and to entrain air upwards from the channels below. The clamp bricks were not stacked vertically but tilted gently inward and ‘battered’ at the sides to improve the stability of the structure, as can be seen in the diagram. There could easily be 30,000 to 45,000 bricks in one clamp and it was not uncommon for there to be up to 150,000. The bricks would take from three to twelve weeks to fire, depending on the size of the clamp. After cooling the clamp was dismantled.
Above: Diagrams of a brick clamp.
Clamps, when fired, produced much smoke and a foul smell from the initial burning of the organic matter within the clay and people living nearby often complained. Brighton brick makers, such as Thomas Scutt, Richard Kent and George Webb, made efforts to appease the locals by trying to complete the brickmaking process as speedily as possible and removing their clamps with all haste.
The brick itself
Bricks from the bottom of the clamp were over burnt and fused together and inappropriate for use in building, while those around the edge were under burnt and could only be used for hidden internal ‘casing’ work, not exposed to the weather. Bricks from the middle were properly burnt and used for all building purposes. When made of the finest quality red clay and properly fired, a brick face could be rubbed to a smooth finish and used as 'rubbers' for gauged brickwork to the facade of the building. Once fired the bricks were sorted into quality and colour appropriate for marketing or for construction.
The colour of brick is determined by several factors including the fuel used to fire the bricks and the levels of oxygen available in the clamp during the firing process, however, the most important factor is the chemical composition of the clay. The chemical which most commonly effects the colour of brick is iron oxide, which usually gives the brick a red colour. Blue is produced when iron oxide is present in very high quantities, while if limestone and chalk are added to iron contaminated clay it produces a buff or yellowish colour. If there is little or no iron or other oxides present in the clay it fires to a white colour. Yellow bricks are produced if magnesium oxide is the principle contaminate in the clay.
Bricks were manufactured to a statute which required that they should be twice as long as they were broad, normally being 8 by 41/2 or 9 x 41/2. The long side of the brick is called the ‘stretcher’ face, the short side, the ‘header’ face, while the breadth of the brick when laid is a 'half brick’.
Brick laying
The job of the bricklayer was to select the bricks for use and to lay them, vertically in rows, to a specified height and ‘bond’, a term used to describe the pattern and sequence in which the bricks are laid. Bonding is extremely important, since, for the wall to be sturdy enough to support the structure of the house, bricks must be ‘bonded’ into a continuous load-bearing wall rather than acting as a collection of individual bricks. By alternating the use of header and stretcher bricks in different ways, walls could be built with different ‘bonds’. The most common Regency bond was the 'Flemish' pattern. Also contributing to effective bonding were good mortar and, sometimes, ‘bonding timbers’ that ran horizontally through the brick courses.
Bonding patterns featuring header faces usually indicate that a wall is at least two brick courses thick. However, whilst many Regency walls appear to have been built that way they often comprise only a single skin of brickwork and the ‘header faces’ are, in fact, simply snapped-off half bricks. It is frequently thought that such walls offer little structural support, but their removal can seriously affect a building’s structural integrity and should only be undertaken after consultation with a structural engineer who has experience of historic properties.
In the case where bricks form the visible facade of a building, they were usually laid by skilled craftsmen who learnt their trade on-site by laying the unseen structural piers of the house. In the case of houses where the brickwork shell is covered with a layer of stucco, however, the standard of workmanship was often lower. Bricklayers developed their skills as they moved form one site being largely drawn from an itinerant population that travelled wherever they could find work in a rapidly urbanising Britain.
The bricklayer joints and spaces his bricks with pug, a long established generic term used to describe a wide variety of mortar mixes. Bricks are traditionally set on a less than 1/2 bed of mortar and this can be cut or ‘struck off’ as laying proceeds, or it can be raked out to about 1/2 in depth and subsequently filled. This later process is labour intensive but can be off-set against the cost of laying a more regular brick pattern.When the Brighton Commissioners appointed brick layers to build the town hall in 1829, they set out very specific requirements. The bricklayers were to provide and lay bricks of the best quality which had to be hard burnt and sound, and the mortar was to be of good burnt grey lime and sharp sand.
When precise ‘gauged’ brickwork was specified, high quality soft red bricks were rubbed to exacting dimensions and then laid on thin mortar beds and joints, so that the facade appeared mathematically precise. A similar illusion could be created by the process of tuck pointing. This form of pointing was invented to simulate eighteenth century brickwork, (where every brick was rubbed true to give an ashlar, or stone-like edge, with very fine joints of around 1/6). As this process meant that every brick had to be squared and trued by hand it was very costly. Tuck pointing, although still labour intensive was a fraction of the cost and became popular in housing up until the first world war. The exact methods involved are still not fully known, however it is believed to have been done in the following way.
Gauged brickwork’ became popular in the eighteenth century. Soft red bricks were rubbed to exacting dimensions and then laid on thin mortar beds, creating a fine joint between each brick. However, this was a very costly process, so ‘tuck pointing’ was invented to simulate gauged brickwork at a fraction of the cost. For this the original jointing of the brickwork was raked out and the wall prepared with a wash of mortar slurry to make a smooth surface. The pattern of the underlying brickwork was then scored on the surface with a ‘Frenchman’ and ‘tucked’ or pointed with lime putty. This tucking mortar was finally trimmed into a thin straight line, imitating the fine jointing of gauged brickwork.
Brick bonding patterns
A facade was raised as true as the bricks would allow. The original jointing of the brickwork was then raked out and the wall was prepared with a wash of colour, usually black or brick colour, which was made of a slurry of mortar. The wall would then be covered with this wash to fill in the raked out spaces and make a smooth surface. This wet surface was then scored with a ‘Frenchman’ to make a new thinner joint and then brushed down.This scored joint was tucked or pointed with lime putty creating a smooth surface using the width of a pointing iron. This tucking mortar was then trimmed into a straight line once again using a Frenchman on the edge of a bevelled rule.

Above: Diagram of brick bonding patterns
The 18th century house was geometrically or ‘mathematically’ composed using Palladian principles. Where this precise linear grid across the facade was desired, it was usually achieved with ashlar stone or rubbed brickwork. These products however, were expensive, and during the Georgian period a method of making and hanging tile in order to imitate high quality bricks was introduced. There is no direct evidence to suggest that geometric considerations were the reason that these came to be known as mathematical tiles, but certainly this is the name by which they were quickly and commonly described.
Authors have come up with several reasons for the use and popularity of mathematical tile. Cliffton-Taylor in his book ‘The Pattern of English Building’ suggests that there were initially two reasons for their employment. The desire to provide protection from the weather and the desire to keep up with fashion. He also believes that the brick tax initially encouraged the use of the tiles as they were a cheaper alternative to brick.
As the tiles gained in popularity they also became ‘fashionable’ and by the Regency period the tiles had become desirable in their own right regardless of their cost and weatherproofing qualities. Henry Holland used mathematical tiles to cover his London house, Sloane Place, and it is said that this was the inspiration for the plans to use mathematical tiles in the original Pavilion at Brighton.
The Brighton developer J. Otto also used mathematical tiles. When he erected the Royal Crescent during the late 18th and early 19th centuries he set black glazed tiles against a light coloured mortar. Mathematical tiles were made in a variety of other colours including blue-black and sandstone cream, the colour being achieved either through the addition of brick dust to the raw clay, or through the use of a liquid slip.
Mathematical tiles were moulded with a lip on the reverse side enabling them to be fitted against battens in much the same way as some roofing tiles are hung, although, sometimes they were bedded into a plaster or mortar sub layer. The drawback to the tile was that it could only be used against a flat surface and required a ‘stop bead’ or wooden edging at each corner of the house. Batty Langley, writing in the 18th century described mathematical tile facades as “most beautiful” with only the returns of the wall “betraying the trick".
If you are interested in further reading on this topic, these links will provide you with more information:
Brick making on the Isle of Wight
Brief history of brick making during the Georgian Period
'History of Brick and Pottery Making in Nettlebed, Oxfordshire' By Malcolm D. Lewis
The Brick Directory; History of bricks
From pugmill to clamp - brickmaking in Bottesford
Old Bricks - History at your Feet; Historial background on brickmaking
Property Drum's Everything you ever needed to know about history and production of bricks
Brickwork and bonds in Georgian, Victorian and Edwardian properties on Freepedia